
We've rolled out a powerful set of features designed to give administrators more flexibility in how they manage taxes, reports, and event visibility. From flexible report dates to multi-tax support across all sellable products, and new controls for community event visibility, these updates put more control in your hands.
Here’s what’s new:
- Apply taxes to space bookings — Configure and apply multiple taxes to spaces, resources, services, and fees.
- Apply more than one tax to tickets — Assign multiple taxes to the same event ticket.
- Control public visibility of submitted events — Automatically hide approved submitted events and room booking requests from your public calendar.
- New date range options for scheduled reports — More date range filters for report exports.
1. Apply Taxes to Space Bookings and Related Items
Now, you can configure and apply taxes to spaces, resources, services, and fees. Also, including multiple taxes on the same item. As a result, the system automatically calculates taxes at checkout and displays them as individual line items, so end users always see a clear breakdown of what they’re paying.
Additionally, you can create taxes once at the workspace or calendar level and reuse them across any product or service.
To set up taxes:
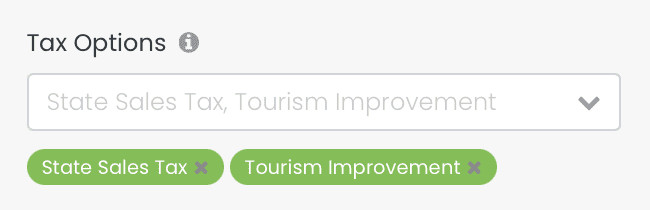
- Go to Settings > Tax Options and create your taxes.
- Open any space, resource, or service and fee configuration.
- Select one or more taxes to apply to that item.

Additionally, the system stores tax details with every order and includes them in reports, ensuring accurate tracking and easy reconciliation.
2. Apply More Than One Tax to Event Tickets
Event tickets now support multiple taxes applied to the same item. The system displays each tax as a separate line item at checkout and stores it with the order for reporting.
To apply multiple taxes to a ticket:
- Open an event and go to the Tickets configuration.
- Use the tax selector to choose one or more taxes.

3. Community Events: Control Visibility of Submitted Events
A new setting lets you decide whether approved submitted events and room booking requests are automatically shown on your public events calendar. This is useful for organizations that want to manage public visibility manually after approval.
To configure this setting:
- Go to Dashboard > Community Events > Settings > Event Approval.
- Toggle Hide submitted events from public calendar on or off.

When enabled, approved events and room bookings are hidden from the public calendar. Furthermore, when disabled (default), they appear publicly as before.
4. Reports: Improved Date Range Options for Scheduled Reports
The date range filters in the event report export have been updated to be more flexible. You can now include or exclude the current date from both past and future date ranges, giving you more precise control when scheduling recurring reports.

Product Update: May 2026
This month's release helps you run smoother operations with less manual intervention. Whether that's through expanded reporting options, by applying multiple taxes automatically at checkout, or controlling exactly what appears on your public calendar.
For more information about those features and to confirm if you have access to them, please contact us. Also, find helpful guides and video tutorials within our Help Center.
Table of Contents


