
At Timely, we are constantly improving our event management solutions. In this post, you will learn about our product update posted on September 2, 2021.
New Event Ticketing Features
If you have the Ticketing feature in your plan, now you will be able to do all these amazing things:
- Refund and cancel invoices and individual tickets and RSVPs;
- Allow attendees to request cancellation of tickets and RSVPs;
- Allow submitters to submit events with external tickets;
- Scan QR codes on event entry to speed up check in; and
- Pass on fees to attendees or absorb fees.
Ticketing: Refund and Cancel Invoices or Individual Tickets and RSVPs
Now, you can refund or cancel invoices and individual tickets for both paid and free events. In other words, for event tickets and RSVPs.
You can access this new feature from the Ticketing menu on your Timely dashboard. See below an example of how to refund or cancel a Ticket invoice using the Invoice Tab:
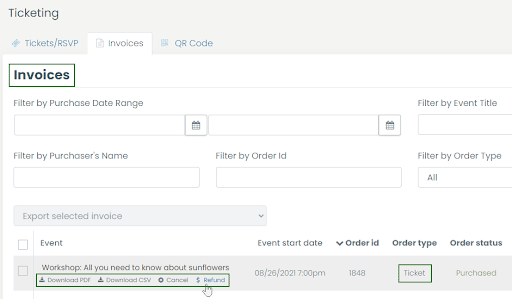
And here an example of how to refund or cancel an individual Ticket from using the Ticketing/RSVP tab:
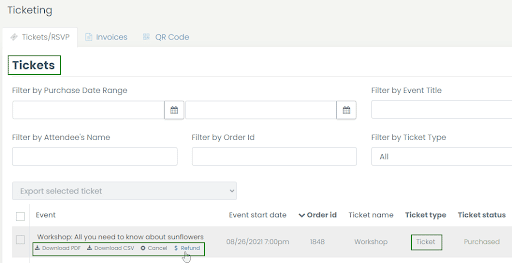
Please remember: you can customize the refund and cancelation emails using the templates on Settings < Email Templates. If you need help, please check our user guide "How to Customize Event RSVP and Ticket Email Templates".
Ticketing: Allow Attendees to Request Cancellation of Tickets and RSVPs
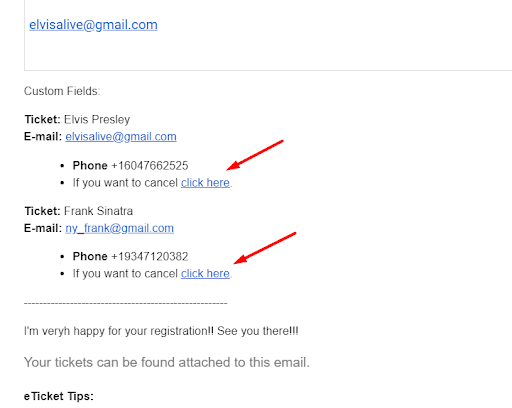
Now, your attendees can request cancellation of event tickets and RSVPs using a link in the confirmation email they receive from you after buying a ticket or reserving a RSVP.
In the image below, you can see where your customer has to click to request the cancellation. it is marked with a red arrow.
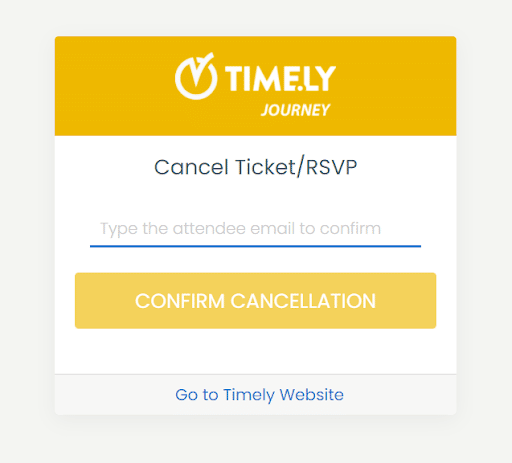
After the customer clicks on the link, he/she will be redirected to a landing page where the customer has to type the correct email address to request and confirm cancellation.
If a customer buys two or more tickets, currently, the ticket or RSVP cancellation has to be done individually. That is to say, ticket by ticket, RSVP by RSVP.
Please note: we've created a new dynamic field that you can include in your email templates. It is called "{{ ticketInformationWithCancellation }}".
Using this field, the emails you send to your attendees will allow them to click on the link to cancel their RSVP or Ticket. You can edit the template according to your needs. Just go to the Settings < Email Templates and locate the template you want to edit: “RSVP Template” or “Ticket Template”. 😉
Ticketing: Allow Submitters to Add External Tickets Link and Price to their Events
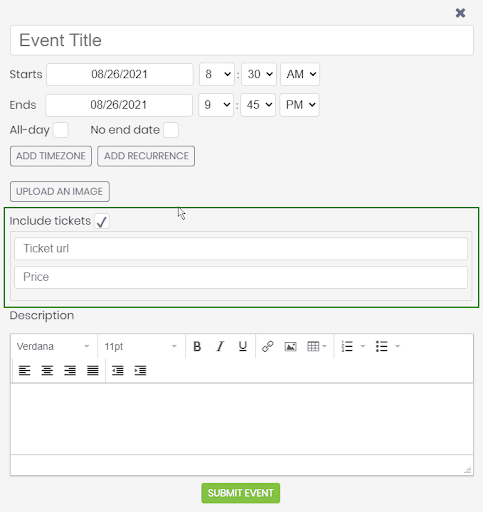
If you have the Event Submission Form feature in your plan, now you can allow your event submitters to add a link to external tickets for their events, as well as their event ticket price.
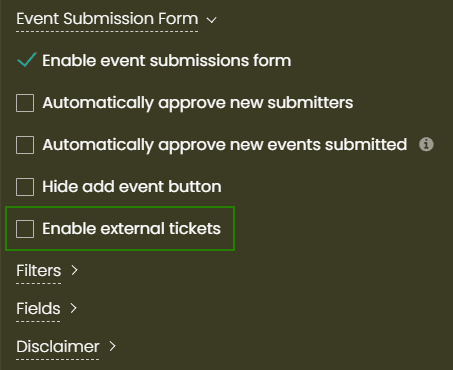
To enable this new functionality, first you must have the event submissions form enabled. Then, you just need to click on “Enable external tickets” option to add this feature to your form.
Your event submitters will see this feature in your event submission form, like this:
Ticketing: Scan QR Codes on Event Entry
This is a great addition to our Ticketing features! Now, you can now use your phone camera to scan QR Codes, allowing a fast check in on event entry. 🥳
To access this feature, go to the Ticketing menu, and then click on the QR Code tab.
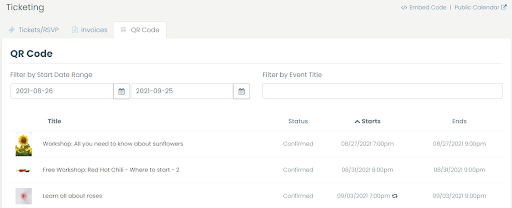
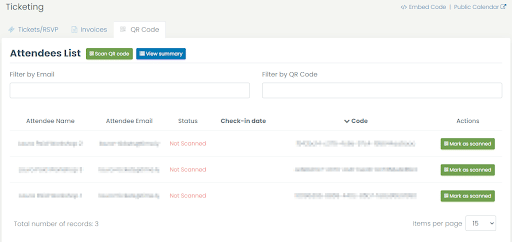
Locate the event you want to scan, and a list of participants will be displayed. You can click on the “Scan QR Code” button to use your phone camera to scan. Alternatively, you can manually click on the “Marked as scanned” button for each participant. Click on the “View summary” button to check the status of your event.
Ticketing: Pass on Fees to Attendees
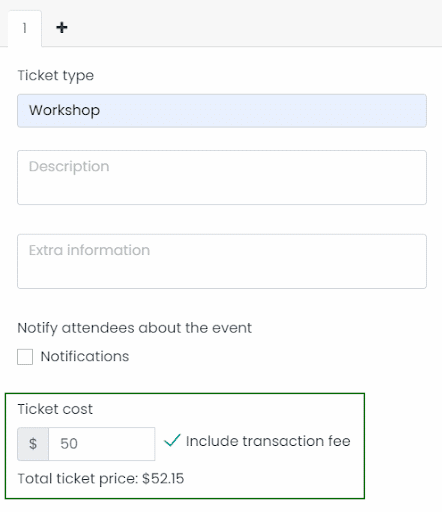
Now, you can pass on the Timely ticketing fee to your event attendees. You do that by enabling the “Include transaction fee” option in your event tickets, when creating an event.
Week View Layout Update
We've made some improvements to the layout of our calendar Week View. Prior to the changes, the event listing occupied only the "first hour" on the calendar. Now, if an event starts at 11AM and ends at 2PM, then the full space between those hours will be dedicated to that event in the Week View mode. Check yours!

Display Recurring Events Only Once
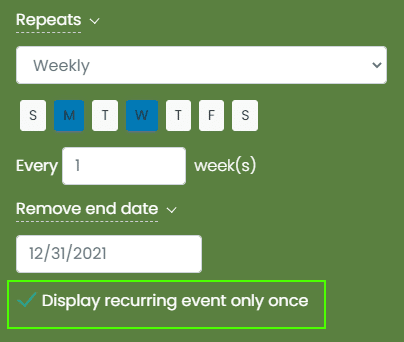
Now, you can display recurring events only once in your calendar. You can do that by clicking on the "Display recurring event only once" option, Timely system will now show only one recurrence of the event in the public view of your events calendar.
If you think you can benefit form our last product update, and would like to have these new features added to your plan, please contact us. We will be happy to help you.
For more user guidance, please go to our Help Center. If you have any questions or need additional assistance, do not hesitate to contact us by opening a support ticket from your Timely account’s dashboard.
Table of Contents

Event Management Updates
If you want to know more Timely company and product update news, please visit our Event Management Blog. There is always something new happening at Timely, so we do our best to keep our clients on the loop!
You might also like

